


Hey there! As a honeycomb paper supplier, I've seen firsthand how honeycomb paper can be a game - changer in the construction industry. It's lightweight, strong, and eco - friendly, making it an ideal material for various construction applications. In this blog, I'll walk you through how to install honeycomb paper in construction.
Understanding Honeycomb Paper
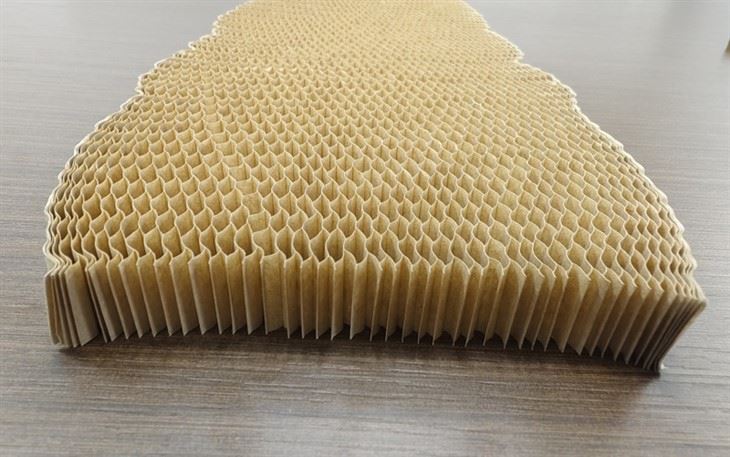
Before we dive into the installation process, let's quickly go over what honeycomb paper is. Honeycomb paper is made by gluing together layers of paper to form a honeycomb - like structure. This structure gives it incredible strength - to - weight ratio. You can find honeycomb paper in different forms, such as 3D Honeycomb Paper Mat, Honeycomb Paper In Sheets, and Honeycomb Paper Roll. Each form has its own advantages and is suitable for different construction tasks.

Tools and Materials Needed
First things first, you'll need to gather the necessary tools and materials. Here's a basic list:
- Honeycomb paper: Depending on your project, choose the right type and size. For example, if you're working on a large - scale wall insulation project, a honeycomb paper roll might be more convenient.
- Adhesive: A good quality construction adhesive is essential for attaching the honeycomb paper. Make sure it's suitable for the surfaces you'll be working with.
- Measuring tools: Tape measure, level, and square to ensure accurate installation.
- Cutting tools: Utility knife or scissors to cut the honeycomb paper to the right size.
- Safety equipment: Gloves, safety glasses, and a dust mask to protect yourself during the installation process.
Pre - installation Preparation
- Surface Preparation: The surface where you'll be installing the honeycomb paper needs to be clean, dry, and free of any debris, dust, or grease. If the surface is uneven, you may need to sand it down or use a leveling compound.
- Measure and Plan: Measure the area where you'll be installing the honeycomb paper. Use your measuring tools to mark the dimensions on the paper. It's a good idea to make a layout plan to ensure efficient use of the paper and minimize waste.
- Cut the Honeycomb Paper: Using your cutting tools, cut the honeycomb paper to the appropriate size. Make sure to leave a little extra margin for adjustments.
Installation Steps
For Wall Insulation
- Apply Adhesive: Use a trowel or a brush to apply a thin, even layer of adhesive on the wall surface. Start from the top and work your way down. Make sure to cover the entire area where the honeycomb paper will be installed.
- Place the Honeycomb Paper: Carefully place the cut honeycomb paper on the adhesive - covered wall. Press it firmly against the wall, starting from one edge and working your way to the other. Use a roller or a flat tool to smooth out any air bubbles or wrinkles.
- Seal the Edges: Once the honeycomb paper is in place, use additional adhesive to seal the edges. This will prevent air leakage and improve the insulation performance.
- Repeat the Process: Continue installing the honeycomb paper in sections until the entire wall is covered. Make sure to overlap the edges of the paper slightly to ensure a continuous insulation layer.
For Flooring Underlayment
- Lay the Honeycomb Paper Roll: Unroll the honeycomb paper roll on the clean and dry floor surface. Start from one corner of the room and work your way across.
- Cut and Fit: Use a utility knife to cut the paper to fit around obstacles such as pipes or doorways. Make sure the paper is laid flat and there are no wrinkles or folds.
- Secure the Paper: Use a flooring adhesive or double - sided tape to secure the honeycomb paper to the floor. Make sure to press it firmly to ensure good adhesion.
- Install the Flooring: Once the honeycomb paper is securely in place, you can proceed with installing your chosen flooring material, such as laminate, hardwood, or tile.
For Ceiling Applications
- Mark the Ceiling: Use a chalk line or a laser level to mark the layout of the honeycomb paper on the ceiling. This will help you align the paper accurately.
- Apply Adhesive on the Paper: Instead of applying adhesive to the ceiling, you can apply it to the back of the honeycomb paper. Use a brush or a spray adhesive for a more even application.
- Lift and Install: With the help of a helper, lift the honeycomb paper and place it on the marked area of the ceiling. Press it firmly against the ceiling and use a roller to ensure good contact.
- Support the Paper: If needed, use temporary supports such as wooden battens or brackets to hold the honeycomb paper in place until the adhesive dries.
Post - installation Checks
- Inspect for Gaps and Wrinkles: After the installation is complete, inspect the honeycomb paper for any gaps, wrinkles, or areas where the paper is not properly adhered. If you find any issues, use additional adhesive or make adjustments as needed.
- Check the Integrity: Make sure the honeycomb paper is securely attached and there are no signs of movement or detachment. This is especially important for load - bearing applications.
- Clean Up: Remove any excess adhesive or debris from the installation area. Dispose of the waste materials properly.
Benefits of Using Honeycomb Paper in Construction
- Lightweight: Honeycomb paper is much lighter than traditional construction materials, which reduces the overall weight of the structure and makes installation easier.
- Strong and Durable: Despite its lightweight, honeycomb paper has excellent strength and can withstand significant loads.
- Eco - friendly: It's made from recycled paper, which makes it a sustainable choice for construction projects.
- Insulation Properties: Honeycomb paper provides good thermal and acoustic insulation, helping to reduce energy costs and noise pollution.
Conclusion
Installing honeycomb paper in construction is a relatively straightforward process that can bring numerous benefits to your project. Whether you're looking to insulate walls, floors, or ceilings, honeycomb paper is a versatile and cost - effective solution.
If you're interested in purchasing honeycomb paper for your construction project, I'd love to help. Just reach out to start a conversation about your specific needs and requirements. I'm here to assist you every step of the way to ensure you get the best honeycomb paper products for your project.
References
- Construction Materials Handbook: A Guide to Building Materials and Their Applications
- Sustainable Construction Practices: Innovations in Green Building Materials


